
There are different flavors or versions of Linux that can be installed in a computer server. One of the more popular ones that are installed is CentOS. CentOS stands for Community Enterprise OS. It is regarded as a free version of Red Hat Enterprise OS, or as others say, a free clone of Red Hat, an enterprise Linux OS. CentOS can be downloaded from their website, www.centos.org, and there are other mirrors available to download them, also found in their website.
Installing the OS is pretty straightforward.
You first have to download an ISO, which is a CD image, from the CentOS website. Then burn the ISO image to a DVD. You can download just the first DVD ISO to install the basic requirements.
You can even download a minimal install ISO, however, in this article we will only cover the standard install as that is one of the more common install requirements for dedicated server customers.
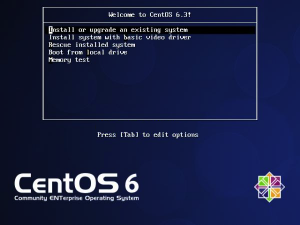
Once the disc has been burned and inserted into the server’s DVD drive, you will need to boot up to the disc (make sure you allow 1st bootup through CDROM/DVDROM from your BIOS settings). Once it boots up you will be greeted with a menu asking for the type of install.
Most of the time, you just select the 1st option “Install or upgrade an existing system.” It will then proceed to load and take you to the next screen, where it tells you that the disc was found and asks you to test the media.
You can skip that part, as more than likely you have burned the disc properly. You can always proceed to test the disc though, but that will take some time. After this step, you will be brought to the GUI (graphical user interface) of the install process.
You can simply select the default selections for the language and keyboard. Even the Ethernet configuration and hostname you can skip for now, as we will address that after the install finishes.
It can also ask you what type of install, if it’s a fresh install or upgrade. Select fresh install, as this is what we are trying to do (we will address doing OS major revision upgrades in a later article).
Once you proceed and select all the defaults that are pre-selected, you will be asked to provide the partition layout of the drive. On most scenarios you will simply need the default partition layout by selecting “Use all space,” which will create a default partition layout. Most of the time this is the default install, unless your customer has a specific requirement on the partition layout, which in that case you will then have to select “Create Custom Layout” and create your client’s partition there.
After this, you will definitely need to write changes to the disk in the next menu. In cases where you have a more complex hardware setup, like having RAID or SCSI, you might want your own partition scheme or even need to load drivers first to detect the drive, which this article will not cover, as most of the time, you will need to follow the instructions of the hardware manufacturer and they would have provided you drivers to install.
Once the changes have been written to disk, it will then ask you what type of install you want. Most of the time, you just select “Basic Server” for most clients, as they will be the ones installing their own modules and plugins, or they will configure themselves after you have provisioned the server and turned over to them.
It will then proceed to complete the install, and you wait for the install to finish. Once done, it will eject the disc and ask you to restart.
At this point you might think you are done, but not just yet. Remember in the beginning we selected pretty much all default pre-selected options. So after the server reboots and brings you to the console login, you will need to connect it to the internet.
The next step to do is to login as root and enter your password. Then once logged in, enter the following command: “setup.” Since you selected basic server configuration, that command should work. If it does not, then it means you selected a different configuration and will need to install some modules/plugins manually (we will cover this in a different article).
Once you are in setup, you go to “Network Configuration,” select “Device configuration.” Most of the time, you select Eth0, assuming you put the network cable in the 1st Ethernet port of the server.
In Network Configuration menu, you leave Name and Device as eth0. Uncheck “Static IP” so you can enter the IP manually. You then have to enter the public IP you want to assign, the subnet or netmask, default gateway IP, and DNS servers. You can then exit and save so you are brought back to the console. You are almost done! You type the following:
Nano /etc/sysconfig/network-scripts/ifcfg-eth0
Then it will bring you a text based configuration setting, which will look something like this:
DEVICE=eth0
HWADDR=00:0a:00:f8:4a:bf
NM_CONTROLLED=yes
ONBOOT=no
IPADDR=1.2.3.4
NETMASK=255.255.255.0
GATEWAY=1.2.3.1
BROADCAST=1.2.3.255
NETWORK=1.2.3.0
BOOTPROTO=none
TYPE=Ethernet
IPV6INIT=no
USERCTL=no
Scroll to the section where it says ONBOOT=no and replace no with yes. Then press Ctrl-X and save the changes to the same file (just press enter when it asks you to save). And finally, you need to restart the network for the new IP to get assigned. You can do this by typing:
service network restart
The network services will now restart and apply the new IP you have assigned. At this point the server should now be accessible, assuming you have assigned the correct IP, and the correct IP subnet has been configured. To test that everything is up and running, you then try to see if you can access outside addresses:
ping yahoo.com
If it’s working, it should show something like this:
PING yahoo.com (98.139.183.24) 56(84) bytes of data.
64 bytes from ir2.fp.vip.bf1.yahoo.com (98.139.183.24): icmp_seq=1 ttl=50 time=17.0 ms
64 bytes from ir2.fp.vip.bf1.yahoo.com (98.139.183.24): icmp_seq=2 ttl=50 time=11.8 ms
64 bytes from ir2.fp.vip.bf1.yahoo.com (98.139.183.24): icmp_seq=3 ttl=50 time=15.3 ms
And now you are done. The next step is to email the IP information and the root password to your client. However, you need to advise them to login to their server and change the default root password and secure the server. At this point it is now up to your client to harden his server and setup his firewall and disable root access, etc.
Congratulations, you have done your initial CentOS installation.

BROUGHT TO YOU BY PROLIMEHOST
We’ve been in the web hosting industry for over a decade, helping hundreds of clients succeed in what they do best and that’s running their business. We specialize in Virtual Private Servers (VPS) and dedicated servers, with data centers in Los Angeles, Denver & Singapore.
VPS SERVICES: LIGHTNING FAST SSD VIRTUAL SERVERS
Our Virtual Private Servers all feature high performance Xeon processors and SSD storage in a RAID10 configuration to optimize your server’s performance, which dramatically enhances visitor experiences on your site.
That speed is backed by unparalleled 24/7 support, featuring both outstanding response AND resolution times to maximize your uptime.
Now is the time to join the ProlimeHost virtual private server revolution.
DEDICATED SERVERS: BACKED BY A 99.9% SLA NETWORK UPTIME GUARANTEE
We only use enterprise-class hardware in our dedicated servers [1] and offer a four (4) hour hardware replacement. Throw in IPMI for remote management, support for public and private networks, free operating system (OS) re-installs, and SATA, SAS & SSD (including NVMe) storage. Call 1-877-477-9454 or contact us [2]. For everything from gaming servers to cheap dedicated servers, we’re here to help.
- Are Bandwidth Offers Confusing? - April 19, 2024
- Linux or Windows Dedicated Server? Which one is better? - February 6, 2024
- How a Bad Hosting Service Could Ruin Your Business - December 4, 2023


