How to Access WHM
Before you install cPanel & WHM, make certain that your system meets all of the minimum requirements for new installations.
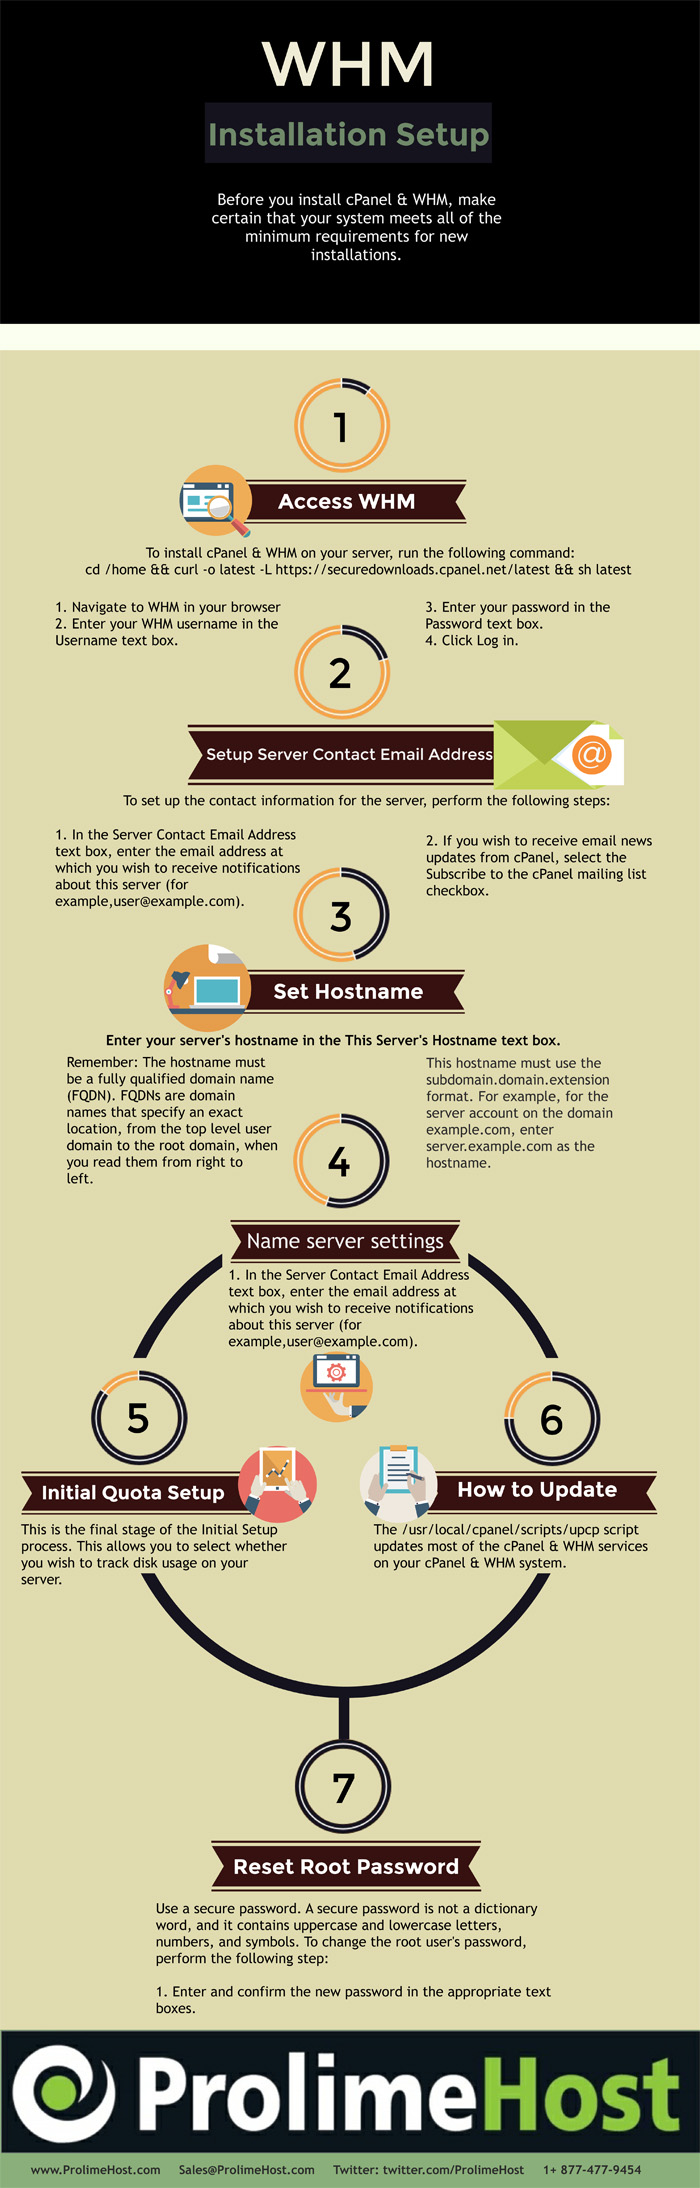
1To install cPanel & WHM on your server, run the following command:
cd /home && curl -o latest -L https://securedownloads.cpanel.net/latest && sh latest
- Navigate to WHM in your browser
- Enter your WHM username in the Username text box.
- Enter your password in the Password text box.
- Click Log in.
Setup Server Contact Email Address
To set up the contact information for this server, perform the following steps:
- In the Server Contact Email Address text box, enter the email address at which you wish to receive notifications about this server (for example,user@example.com).
- If you wish to receive email news updates from cPanel, select the Subscribe to the cPanel mailing list checkbox.
- If you wish to receive notifications as text messages, enter your cell phone or pager email address in the Server Contact SMS Address text box (for example, user@phonecompany.com or 8005551212@provider.com).
- If you wish to receive notifications as AIM messages, select the Server Contact AIM Name checkbox.
- If you wish to receive notifications as ICQ messages, select the Server Contact ICQ Number checkbox.
Set Hostname
Enter your server’s hostname in the This Server’s Hostname text box.
Remember: The hostname must be a fully qualified domain name (FQDN). FQDNs are domain names that specify an exact location, from the top level user domain to the root domain, when you read them from right to left. This hostname must use the subdomain.domain.extension format. For example, for the server account on the domain example.com, enter server.example.com as the hostname.
Name server settings and assigning IP addresses
Your server must have at least one IP address, which will function as the primary IP address of your server. If you do not have an IP address, visitors cannot access your server.
To add IP addresses, perform the following steps:
- In the IP Address(es) to Add text box, enter your server’s IP addresses.
Note:
Use CIDR notation to add multiple IP addresses simultaneously. For more information, refer to the Quick CIDR Reference Table to the right of the interface.
- In the Subnet Mask text box, enter the appropriate subnet mask for your range of IP addresses.
Note:
This value defaults to 255.255.255.0.
- Check to ensure that the displayed Network/Ethernet Device is correct (for example, eth0).
- Click Add IP(s)
Set Nameservers
Nameservers populate your server’s DNS information throughout the Internet to allow visitors to access websites on your server.
- Select the nameserver software that you wish to use. You can choose BIND, MyDNS, NSD, or Disabled. The option defaults to BIND. The BIND nameserver software is adequate for most servers.
- Choose the nameservers that domains on this server will use. To configure your nameservers properly, make certain to complete the following steps:
- Obtain two IP addresses from your datacenter. You must have one IP address for each nameserver.
- Register your nameservers with the name registrar that you used to register your domain name.
- Ask your data center to set up reverse DNS pointers.
- Enter your nameservers in the Nameserver 1, Nameserver 2, Nameserver 3, and Nameserver 4 text boxes.
Note:
You must enter at least two nameservers. Additional nameservers prevent downtime if your first two nameservers experience problems.
Add A Entries for Nameservers & Hostname (A entries are records on your server that resolve domain names to their IP addresses).
To add A entries, perform the following steps:
- Select the Add “A Entries” for all Nameservers
- Enter the IP addresses for each of your nameservers in the text box that corresponds to that nameserver.
- Select the Add “A Entries” for Hostnamecheckbox if you wish to add an A entry for your server’s hostname.
- If you selected the Add “A Entries” for Hostnamecheckbox, enter the IP address for your server in the IP for Entry text box.
Set Services
This allows you to configure the services that you and your clients use on the server.
To use the default settings, Use Default Settings at the top of the interface (FTP, Mail and cPHulk Brute Force Protection configuration).
Initial Quota Setup
This is the final stage of the Initial Setup process. This allows you to select whether you wish to track disk usage on your server.
- Servers that use the XFS® filesystem and run CentOS 7, CloudLinux™ 7, or Red Hat® Enterprise Linux (RHEL) 7 require additional actions for quotas to function properly:
- WHM Interface— After you enable quotas in WHM’s Initial Setup Wizard interface and the system performs the necessary configuration changes, a button appears in the top right corner of the WHM interface. You must click this button to reboot the system. After the system reboots, a quota scan runs in the background to complete the process.
- Command Line— Run the /scripts/fixquotas script and then reboot the server.
- Manually via the Command Line— For instructions on how to perform the /scripts/fixquotas script’s actions manually, the Red Hat XFS and XFS Quota Management documentation.
If you have enabled Quota System Administration notifications, the system sends notifications when it is ready to reboot and when the quota scan finishes and quotas are functional.
- CloudLinux 7 updates may break quotas. For this reason, after each CloudLinux 7 update, you mustrun the /scripts/fixquotas script and then reboot the server.
How to Update cPanel & WHM
The /usr/local/cpanel/scripts/upcp script updates most of the cPanel & WHM services on your cPanel & WHM system. You can run this script in two ways:
- Use WHM’s Upgrade to Latest Version interface (Home >> cPanel >> Upgrade to Latest Version).
- On the command line, run the /usr/local/cpanel/scripts/upcp script as the root user.
This script also calls the following scripts within the /usr/local/cpanel/scripts/ directory to update most of the software on your system:
Reset the Root Password
Use a secure password. A secure password is not a dictionary word, and it contains uppercase and lowercase letters, numbers, and symbols.
To change the root user’s password, perform the following steps:
- Enter and confirm the new password in the appropriate text boxes.
Notes:
- The system grades the password that you enter on a scale of 100 points. 0 indicates a weak password, while 100 indicates a very secure password.
- Some web hosts require a minimum password strength. A green password Strengthmeter indicates that the password is equal to or greater than the required password strength.
- Click Password Generator to generate a strong password. For more information, read the Password Generator – x3
1 https://documentation.cpanel.net/display/ALD/Installation+Guide+-+System+Requirements
Brought to you by ProlimeHost
We’ve been in the web hosting industry for ten years, helping hundreds of clients succeed in what they do best and that’s running their business. We specialize in dedicated servers, with data centers in Los Angeles, Phoenix, Denver and Singapore.
The E3 1275 v5 processor is now available at great pricing, giving you the ability to add up to 64GB of DDR4 ECC RAM. Call +1 877 477 9454 or email us at Sales@ProlimeHost.com. We’re here to help.

ProlimeHost specializes in dedicated servers, with data centers in Los Angeles, Utah and Denver. Call +1 877 477 9454 or email us at Sales@ProlimeHost.com. We’re here to help.
- What you need to know about the web hosting industry - July 4, 2025
- Running a Business | Triggers of Influence - July 3, 2025
- Increase Your Online Sales | Some Tips - July 2, 2025


